
Frame Designer
The full-page layout editor: up to 16 photo boxes, per-shot rotation, layers, simultaneous dual-camera positions, survey-answer text and printable-precision alignment tools.
Canvas & toolbar
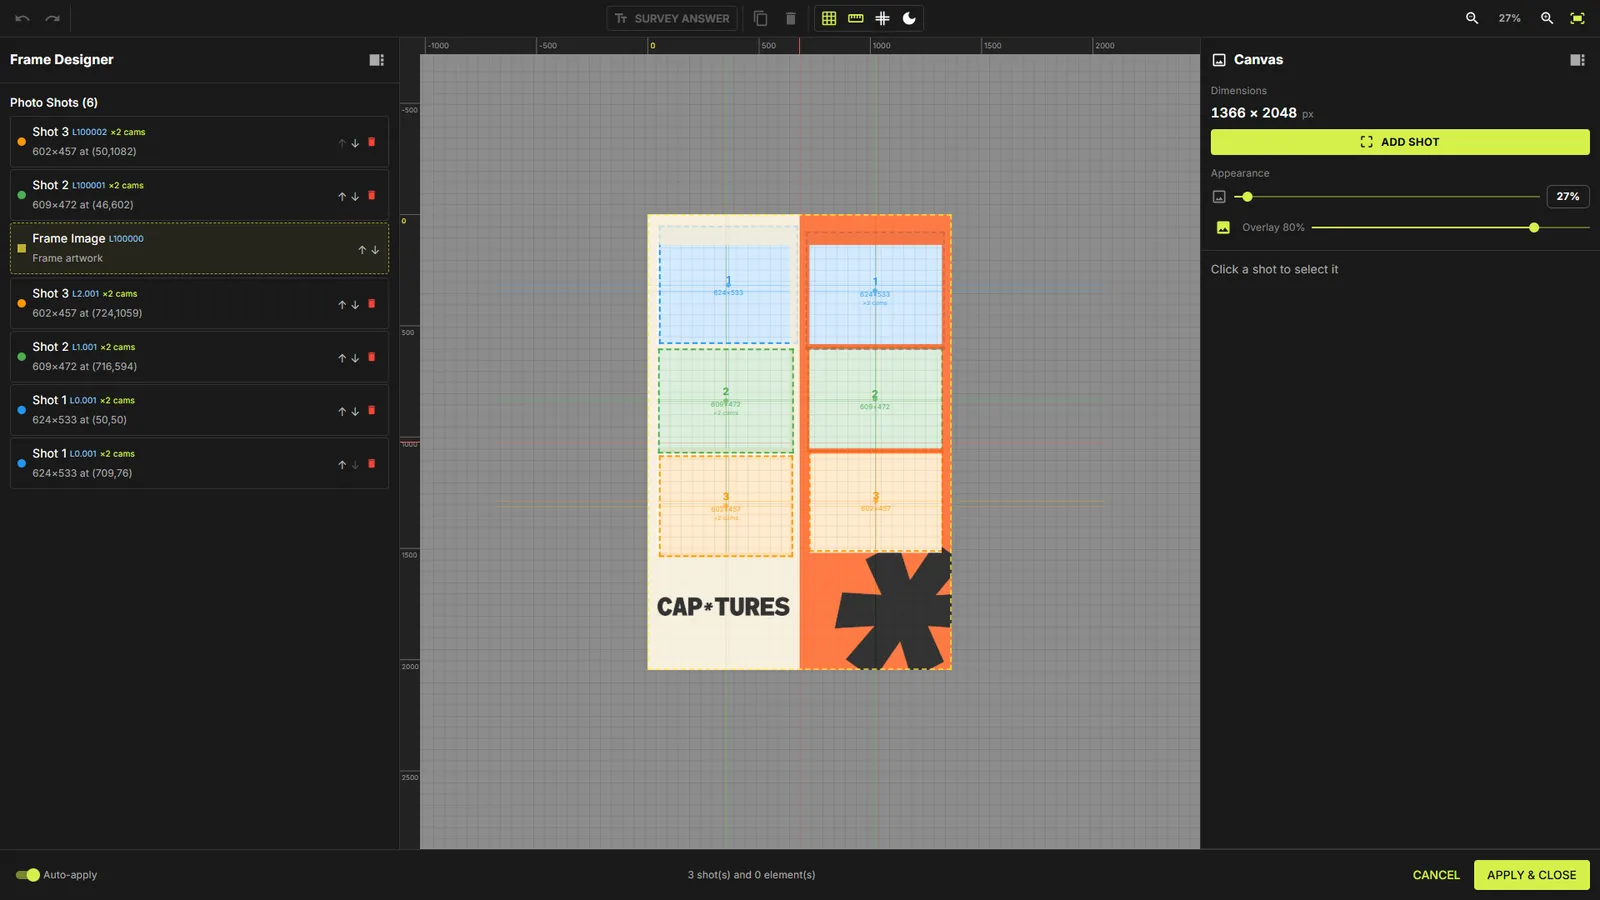
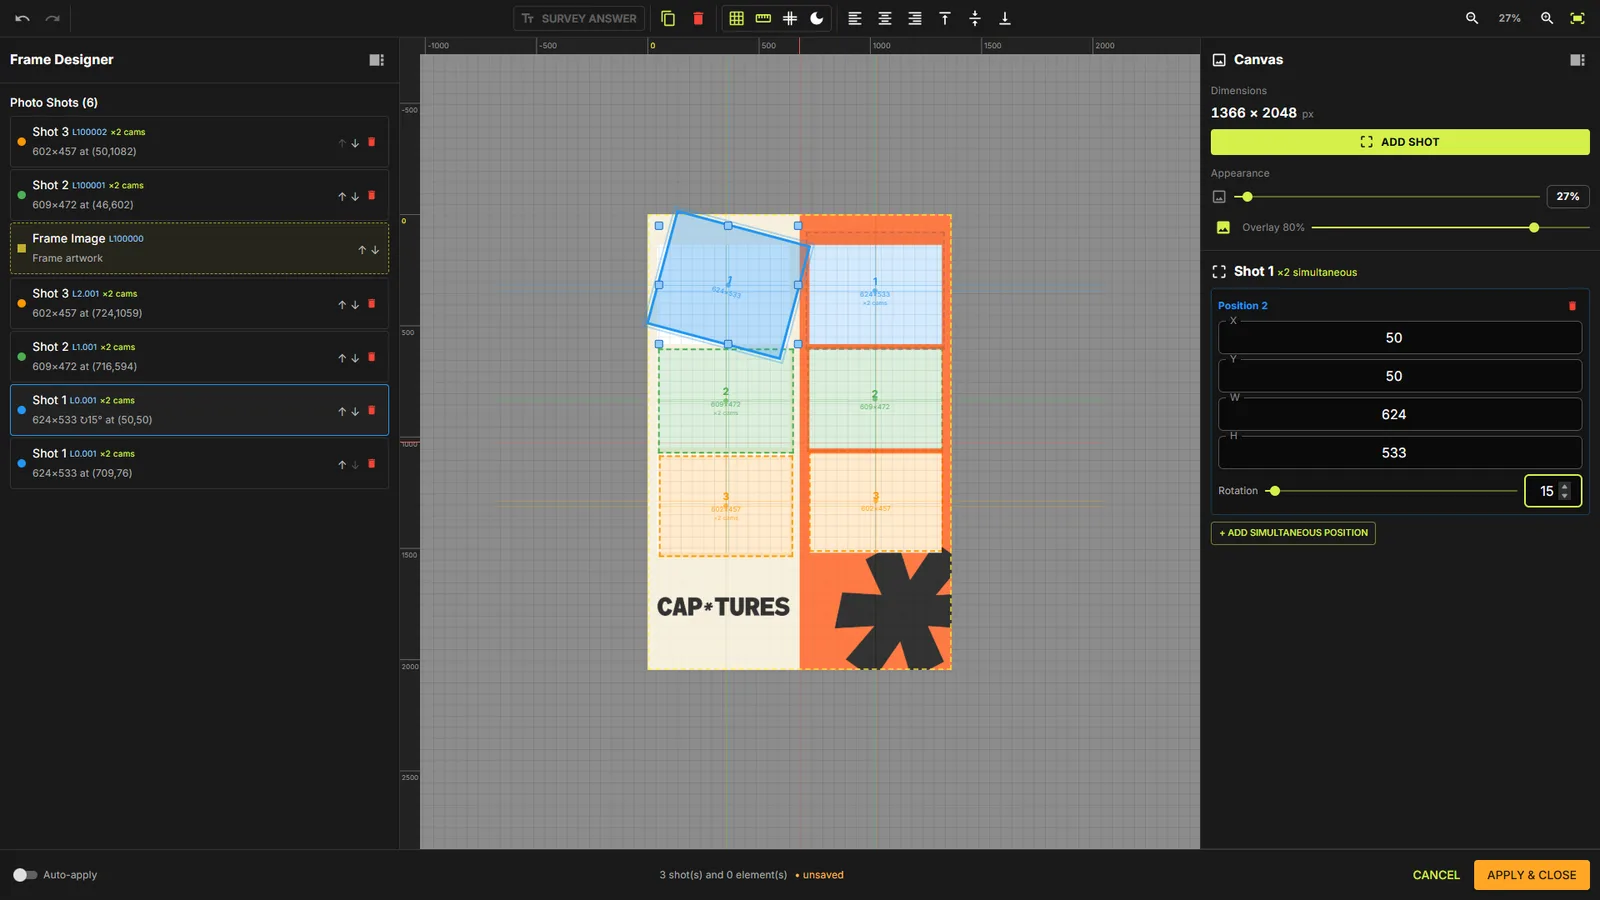
Open the designer from a frame's Basics tab → DESIGN LAYOUT. The canvas shows your frame artwork at its true pixel size (e.g. 1366 × 2048 px, set by the uploaded artwork) surrounded by a bleed workspace, so boxes can intentionally hang off the edge.
The workspace
Left panel: Photo Shots layer list. Center: the canvas. Right panel: Canvas info (Dimensions, ADD SHOT, Appearance) and the properties of whatever you select. Bottom bar: Auto-apply switch, a live status line (e.g. “3 shot(s) and 0 element(s) • unsaved”), CANCEL and APPLY & CLOSE.
Toolbar controls
Every canvas helper lives in the top toolbar:
| Control | What it does |
|---|---|
| Undo / Redo | Step back or forward through up to 50 changes (Ctrl+Z / Ctrl+Shift+Z) |
| SURVEY ANSWER | Add a text element bound to a survey question (menu lists all questions) |
| Duplicate / Delete | Copy the selected boxes (pasted +20px offset) or delete them instantly |
| Show grid | Toggle the grid overlay |
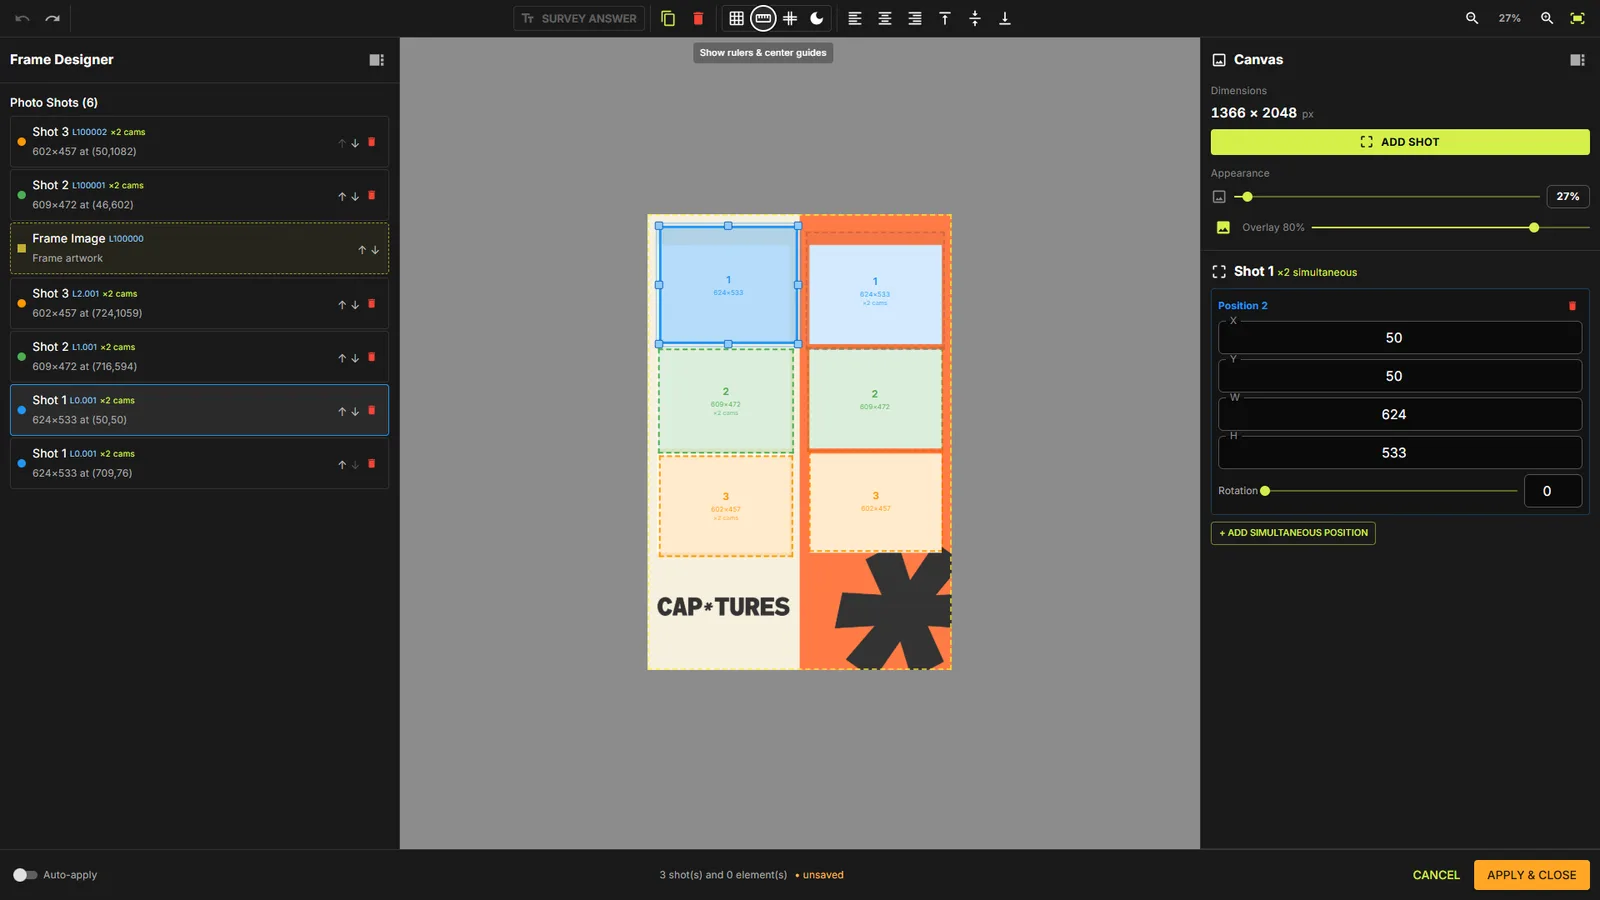
| Show rulers & center guides | Pixel rulers on top/left plus red center-of-frame guide lines |
| Snap to grid | Round drag/resize to the grid — grid size editable, default 50px (min 5px) |
| Dark/light canvas | Flip the canvas background to check light or dark frame artwork |
| Align ×6 | Align left / horizontal center / right / top / vertical center / bottom — to the frame, or to the selection bounds when 2+ boxes are selected |
| Zoom − / % / + / Fit | Zoom 10%–400% in 25% steps; Fit re-enables auto-fit to the window |
Grid, rulers & reference overlay
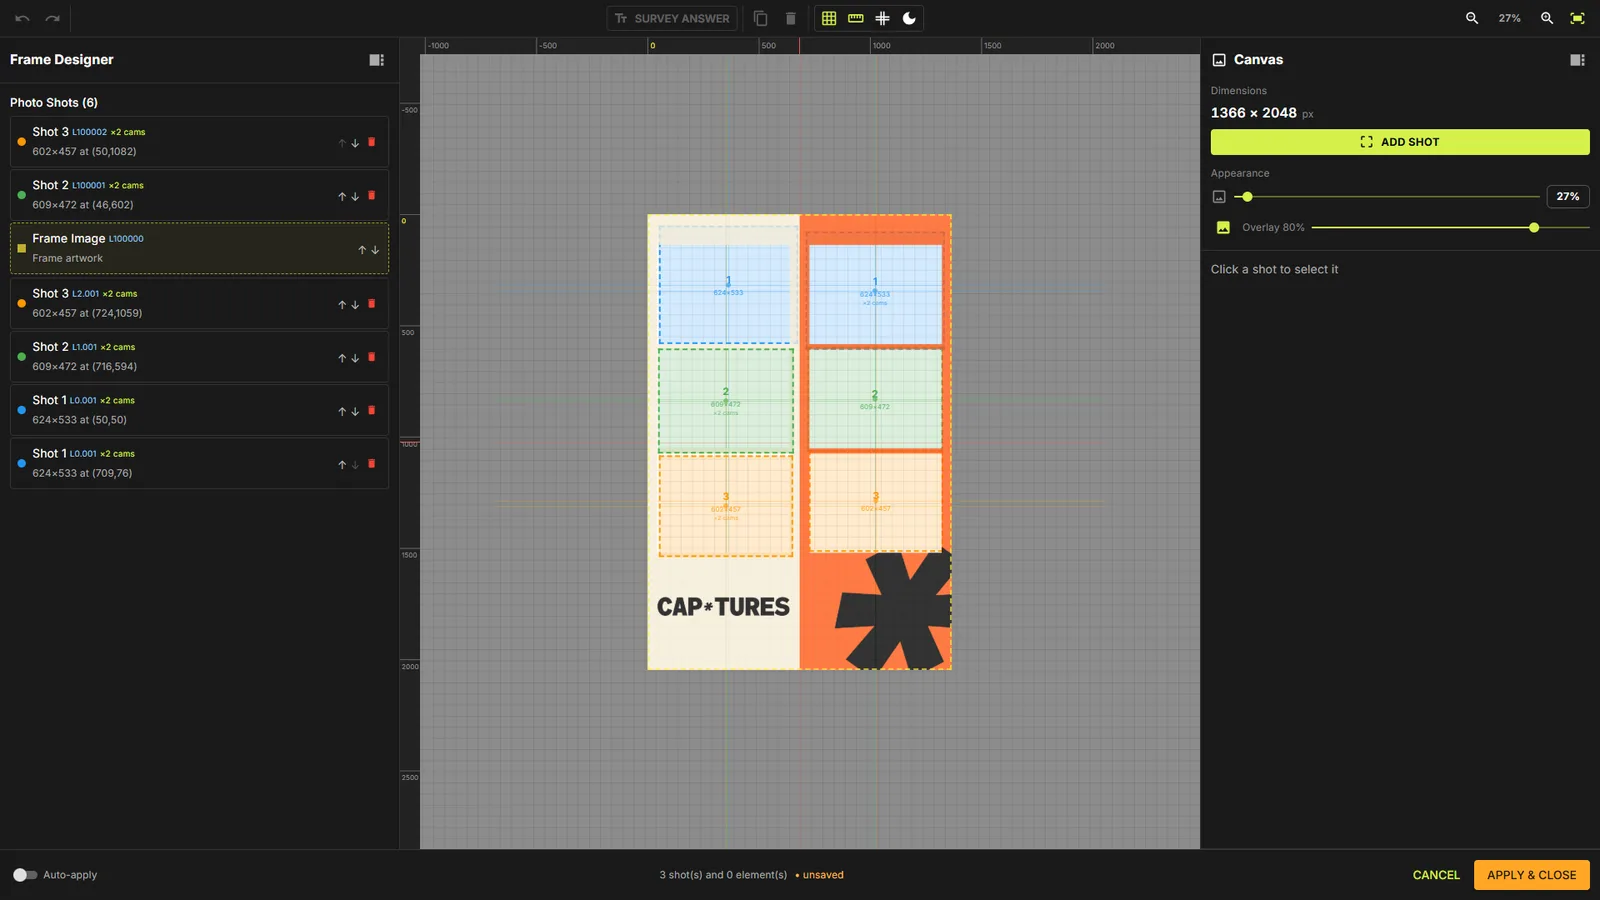
With rulers on you get red center guides for perfect symmetry. In the right panel's Appearance box you can also load a reference overlay image and dial its opacity — handy for matching a client's mock-up while you position boxes.
Shots & layers
Adding shots
ADD SHOT creates a new photo box (200×200 at position 50,50). A frame holds up to 16 boxes in total — simultaneous twin positions count toward the limit. Each shot gets its own color so you can tell them apart at a glance.
The layer list & L-codes
Every row in the Photo Shots panel shows its layer code (e.g. L0.001, L100000) — a z-order number where higher values draw on top. The Frame Image itself is a layer too (default L100000, above all photos, so artwork borders cover photo edges). Use the ↑ “Bring forward” / ↓ “Send backward” arrows or simply drag rows to reorder; the designer computes fractional layer values to slot items between neighbours.
Selecting & editing a shot
Click a box on the canvas (or its row in the list) to select it. The right panel shows exact X, Y, W, H fields (pixels, minimum box size 20px) plus a Rotation control. Ctrl+Click selects multiple boxes — drag any one to move the whole group, and the alignment buttons then work on the group.

Simultaneous positions & dual camera
One shot can appear in more than one place on the frame — and with two cameras, both places can be captured at the same instant.
+ ADD SIMULTANEOUS POSITIONPro
With a shot selected, press + ADD SIMULTANEOUS POSITION to give it a twin position in the same slot. The layer list then labels the shot “×2 cams”, the properties panel shows “Shot N ×2 simultaneous” with a separate Position block (own X/Y/W/H/Rotation and a delete icon) for each twin.
Assigning cameras (M / S badges)Pro
When the frame's Capture tab is set to Two cameras, each box on the designer canvas gets a small role badge — blue M for the Main camera, amber S for the Second. Click the badge to flip a slot between cameras.
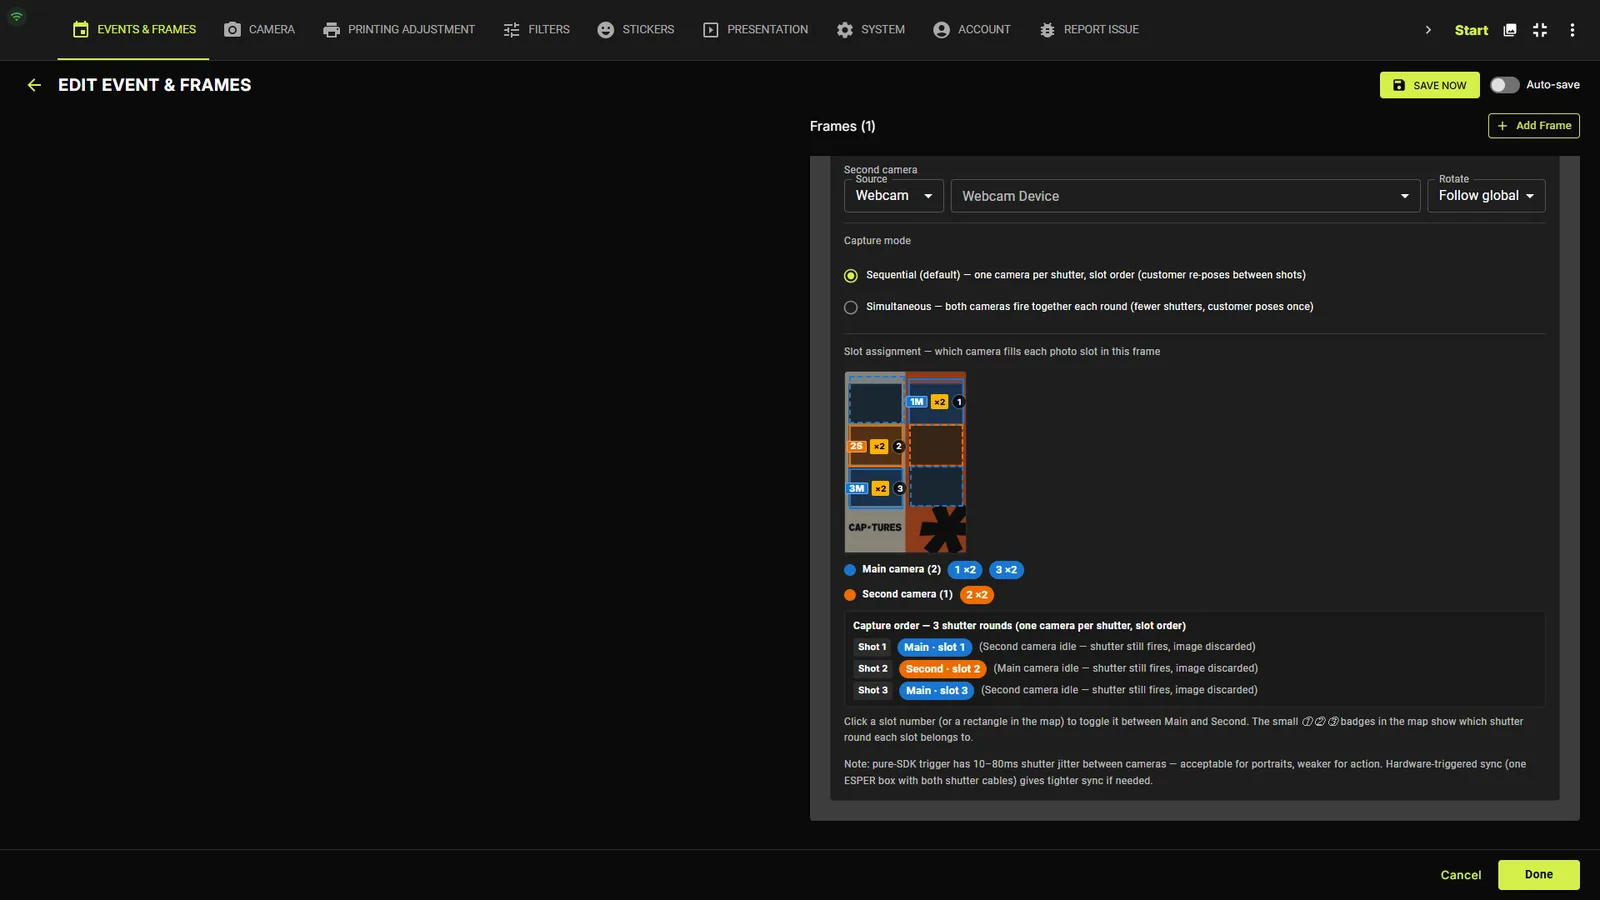
Dual-camera setup in the Capture tabPro
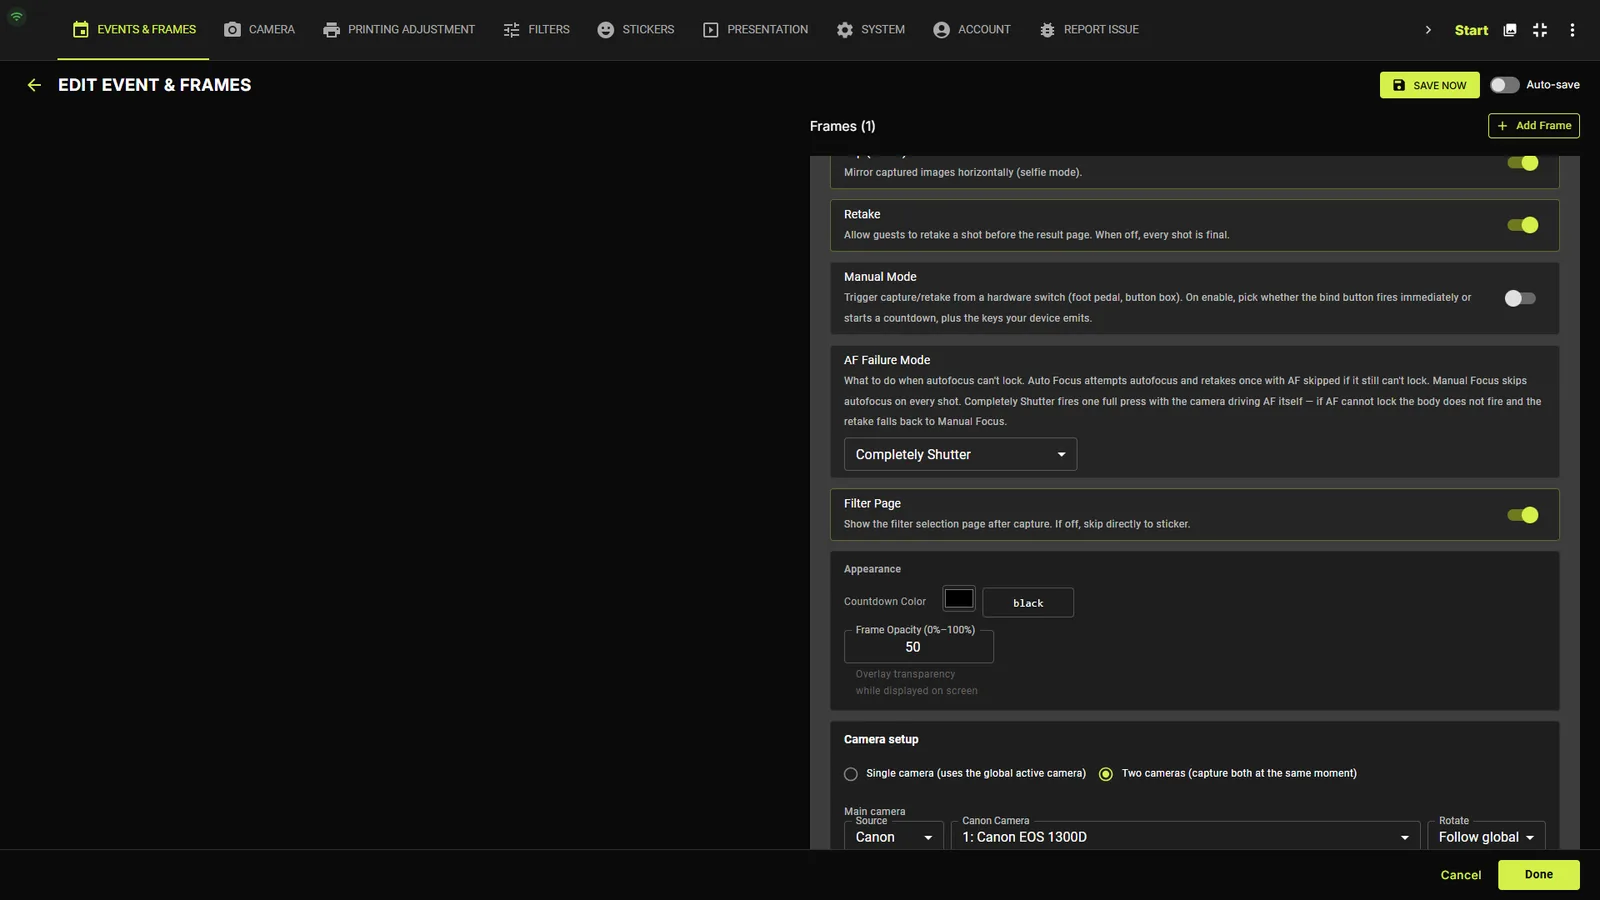
Under Camera setup choose Two cameras (capture both at the same moment). Pick the Main and Second devices — each with its own Source (Canon / Webcam) and per-camera Rotate (Follow global / 0° / 90° / 180° / 270°).
Sequential vs Simultaneous & slot assignmentPro
Capture mode offers Sequential (default) — one camera per shutter in slot order, guests re-pose between shots — or Simultaneous — both cameras fire together each round so guests pose once. Below it, the Slot assignment map shows every photo slot with its camera (1M, 2S, …); click a slot to toggle it, and the Capture order panel explains exactly which camera fires on each shutter round.
Pure-SDK triggering has 10–80 ms shutter jitter between cameras — fine for portraits, weaker for action. One ESPER trigger box wired to both shutters gives tighter hardware sync.
Rotating & resizing
Rotate any box 0–360°
Every photo position and survey element has a Rotation slider plus a numeric field (values wrap around 360, so typing 370 becomes 10°). The canvas box tilts live and the layer list annotates it — e.g. “624×533 ↻15° at (50,50)”. On multi-position shots each twin rotates independently.
Resize handles & smart guides
A selected box shows 8 resize handles (corners + edge midpoints). Hold Shift while resizing to lock the aspect ratio. While dragging, blue smart-alignment guides appear when an edge or center lines up with another box (within 5px), and Snap to grid rounds everything to your grid size.
Survey Answer text on the print
Add and style the elementPro
The SURVEY ANSWER toolbar button (enabled when the frame has survey questions) drops a text element bound to a question. Its properties: position/size/rotation like any box, plus Font (built-ins or upload your own .ttf/.otf/.woff), Size 8–300px, Bold/Italic toggles, alignment Left/Center/Right, and a color picker.
TipThe Estimated capacity hint calculates how many characters fit the box at the current font size — with one-click buttons to copy that number into the question's max-length limit.
Keyboard shortcuts & saving
Shortcuts
The designer is fully keyboard-friendly:
| Keys | Action |
|---|---|
| Ctrl+Z / Ctrl+Shift+Z (or Ctrl+Y) | Undo / redo (50-step history) |
| Ctrl+C / Ctrl+V | Copy and paste selected boxes (+20px offset) |
| Delete / Backspace | Delete selected boxes immediately |
| Arrow keys | Nudge selection 1px — hold Shift for 10px |
| Shift while resizing | Lock aspect ratio |
| Ctrl+Click | Multi-select boxes |
Auto-apply, Apply & Close, Cancel
With the Auto-apply switch on (bottom-left, remembered per machine) every change saves itself after a short pause — the status line flips from “applying soon…” to “applied ✓”. With it off, changes stay “unsaved” until you press APPLY & CLOSE (the button turns amber when there's something to save). CANCEL leaves without applying pending changes.